How to Monitor Network Bandwidth Using Nload on the Terminal in Ubuntu
This is an article about how to monitor network bandwidth usage on a Linux system, specifically focusing on using the nload utility. In this article, you will find information about installing and configuring nload, understanding its output, and utilizing it for real-time monitoring of your internet connection’s traffic.
Introduction to Network Bandwidth Monitoring
Monitoring network bandwidth is essential in managing resources efficiently, diagnosing performance issues, and ensuring that your system or server does not exceed the capacity of its network infrastructure. With a plethora of tools available, nload stands out due to its simplicity and real-time nature. This tool provides a clear visualization of incoming and outgoing data transfer rates on a per-network interface basis.
What is Nload?

Nload is an open-source utility designed for monitoring the incoming and outgoing traffic through network interfaces in real time. It runs from the command line, making it accessible even without a graphical user interface (GUI). With its straightforward yet informative display of bandwidth usage, nload is highly useful for system administrators and developers who need to keep track of their network resources.
Installing Nload on Ubuntu
To install nload on your Ubuntu machine, you first need to open the terminal. You can do this by pressing Ctrl+Alt+T or searching for “Terminal” in your applications menu.
Once the terminal is open, update the package list and install nload using the following commands:
These steps ensure that you have the latest software packages available before installing nload.
Configuring Nload
After installation, nload can be launched simply by typing nload into your terminal and pressing Enter. However, for more customized monitoring, a configuration file exists where you can set up various options.
To modify the default settings or configure specific interfaces to monitor, navigate to /etc/nload.conf. You can edit this file using any text editor of your choice, such as nano, by running:
Within this configuration file, you will find numerous options that allow customization, including interface selection (INTERFACE), refresh rate (REFRESH_INTERVAL), and graph colors. To save changes and exit the text editor in nano, press Ctrl+O, then Enter, followed by Ctrl+X.
Understanding Nload Output
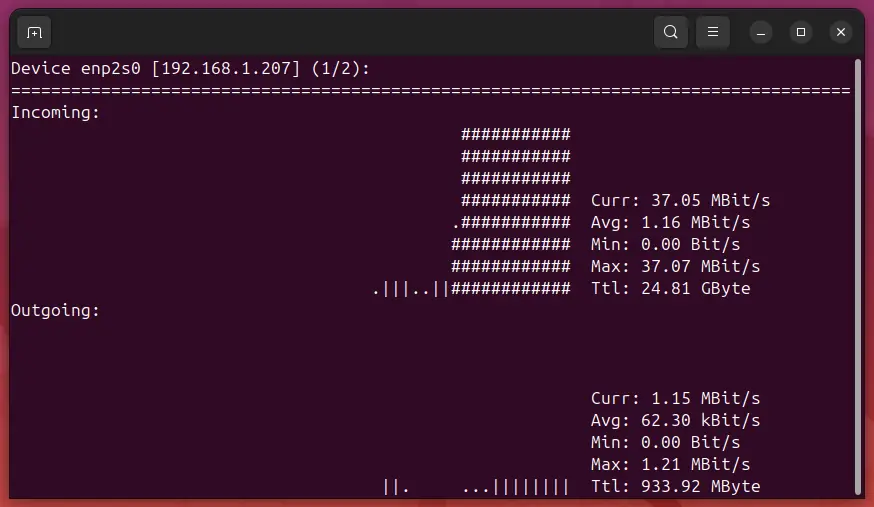
Upon launching nload with no arguments or after configuring settings, you will see a screen split into two sections: one for incoming data (down) and another for outgoing data (up). Each section contains:
- Rate: The current rate of data transfer in kilobytes per second.
- Traffic: Total amount of traffic transferred since the start of monitoring.
- Peak: The highest recorded rate during the session.
Below these metrics, you will find a graphical representation showing the current bandwidth usage as well as historical trends over time. This visualization helps identify spikes or patterns in network activity.
Real-Time Monitoring with Nload
To effectively use nload, it’s important to keep an eye on both real-time and long-term data trends. By default, nload updates its display every second, allowing you to observe fluctuations in traffic instantly. Pressing any key will pause the updates temporarily, which can be useful for examining detailed information at a specific moment.
For extended monitoring sessions, consider redirecting the output of nload to a log file using commands such as:
This allows you to review bandwidth data over days or weeks without having to keep the terminal open continuously.
Advanced Use Cases
Beyond basic monitoring, nload can be integrated with other tools for more sophisticated analysis. For instance, combining it with iftop (another popular bandwidth monitor) could offer a comprehensive view of both overall traffic trends and individual connections consuming resources. Additionally, scripting capabilities allow automating the collection and processing of data for deeper insights.
Conclusion
Read this article to find out about how to install, configure, and utilize nload effectively on Ubuntu systems for real-time network monitoring purposes. With its straightforward interface and powerful features, nload stands as a reliable tool in any Linux user’s arsenal when it comes to keeping tabs on bandwidth usage and optimizing network performance.
By following the steps outlined here, you can start tracking your network traffic immediately, helping ensure that your system operates within optimal conditions and avoids potential bottlenecks.
Last Modified: 24/05/2019 - 20:12:59
